
You’re scrolling through flooring options online or walking through the home improvement store. Everything looks good in the pictures. The salesperson says it’s all “great quality.” But which one actually works for your specific situation?
Here’s your step by step guide to choosing flooring that’ll still look great and function perfectly ten years from now, not just on installation day.
Step 1: Test Your Rooms for Moisture
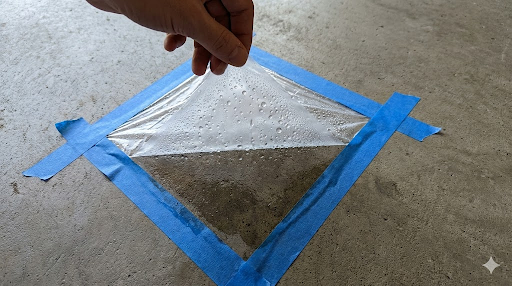
Grab a piece of plastic wrap and some tape. Cut a 12 inch square, tape it completely sealed to your floor in each room you’re replacing, and wait 24 hours. Come back and check underneath.
See condensation or darkening? You have moisture issues that’ll destroy the wrong flooring choice. Basements, bathrooms, and kitchens often have higher moisture. This simple test tells you whether you need waterproof materials or if you have flexibility.
If you see moisture, your options narrow to luxury vinyl plank, tile, or specially treated engineered hardwood. Regular laminate or solid hardwood will warp and buckle in these conditions, guaranteed.

Step 2: Calculate Your Real Traffic Level
Be honest about how your space actually gets used. Here’s how to figure it out:
Low traffic: Guest bedrooms, formal dining rooms, offices. These see occasional use. Most materials work fine here.
Medium traffic: Main bedrooms, living rooms. Daily use but not constant. You need moderate durability. Avoid the cheapest options but don’t need commercial grade.
High traffic: Hallways, kitchens, entryways, rental properties. Constant use, lots of foot traffic, potential spills. You need tough materials rated for commercial use, not residential.
For homes with pets, automatically bump every room up one traffic level. Dog nails are harder on floors than human feet.

Step 3: Match Material to Room Function
Use this quick reference guide:
Bathrooms: Luxury vinyl plank (waterproof, warm underfoot) or tile (classic, completely waterproof). Never use laminate or regular hardwood.
Kitchens: Luxury vinyl plank, tile, or sealed hardwood if you’re diligent about spills. Avoid anything that can’t handle water or dropped items.
Basements: Only waterproof options. Luxury vinyl plank or tile designed for concrete. Test for moisture first using the plastic wrap method above.
Bedrooms: Your choice based on preference and budget. Carpet for warmth, hardwood for elegance, laminate for budget friendliness.
Living areas: Hardwood or luxury vinyl that mimics wood. Avoid carpet in high traffic living rooms unless you enjoy constant cleaning.
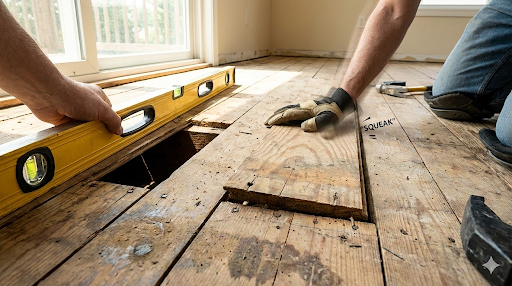
Step 4: Check Your Subfloor Before You Buy Anything
Here’s what to do: Walk every inch of your floor slowly. Listen for squeaks. Feel for soft spots. Look for visible damage, stains, or unevenness.
Bounce gently in different spots. Does it feel solid or springy? Springy means subfloor issues that need fixing before new flooring goes down.
Place a long level or straight board across your floor in multiple directions. Gaps under the level bigger than a quarter inch mean your floor isn’t level enough for most flooring. You’ll need leveling compound or subfloor repairs.
Why does this matter? Because new flooring over bad subfloor looks terrible and fails fast. Fix the foundation first or waste money replacing floors twice.

Step 5: Calculate Total Cost, Not Just Material Price
Take the price per square foot you’re seeing and multiply it by your square footage. Now add these real costs everyone forgets:
Underlayment: Add $0.50 to $1.50 per square foot depending on material
Removal of old flooring: Add $1 to $3 per square foot
Subfloor repairs: Budget $200 to $500 minimum, more if you found major issues in Step 4
Transitions and trim: Add $100 to $300 depending on room size
Moving furniture: Either your time and back pain, or $100 to $300 for professionals
Installation labor: Usually $3 to $8 per square foot depending on material complexity
Following these steps means you’re picking flooring that actually works for your situation. Curious about what actually happens during professional flooring installation and why some jobs turn out perfect while others start failing immediately? Check out the next post where we break down the real installation process step by step.